


What's new in Sculpt OS 25.04
With Sculpt OS 25.04 released earlier this week, let's take a closer look at some highlights like the new multi-monitor window-management capabilities, display rotation, enhanced sandboxing UI controls, a welcome web-browser update, and enhanced hardware compatibility.
As the official news announcement is rather sparse on details, I'd like to give you a more detailed overview of the new version, garnished with the relevant technical bits and pieces of the official documentation of Sculpt 25.04 as well as the two preceding Genode framework releases 24.11 and 25.02 providing the underpinnings.
- Official announcement
- Sculpt download page
- Up-to-date documentation
Sculpt OS 25.04 is available for Intel PCs, the MNT Reform laptop (based on i.MX8MQ), and the PinePhone. With the new version, it also has become compatible with Intel's Meteor-Lake hardware as used by the current lineup of Framework laptops.
Multi-monitor window management
Sculpt's multi-monitor support as introduced in the previous release covered mirrored and panoramic multi-monitor setups whereas the panoramic mode presented the entire panorama as one large display spanning all monitors. The new version extends the system's multi-monitor awareness to the window manager and its companion components, thereby addressing the interplay between virtual desktops and physical displays, preserving the reachability of all applications whenever a monitor is unplugged, and improving the ergonomics of interactive window manipulations.
|
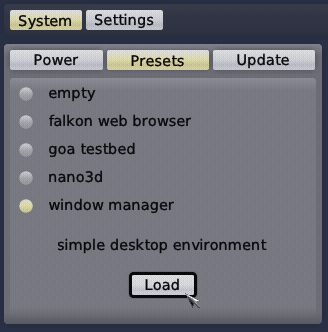
The best starting point for getting acquainted with the new conveniences is the window-manager preset that can be activated in the system menu. It includes several components like the window manager, decorator (drawing the window decorations), layouter (responsible for window manipulation), as well as a ready-to-use system shell that gives you access to Sculpt's report and config file systems. Additional applications can be integrated as guided by the documentation.
For interactively moving or resizing a window, the user used to need a good aim to grab the corresponding window handles as presented by the decorator. The new version adds the ability to click anywhere within a window while the wm-modifier key (i.e., Super) is held. Depending on the position within the window, the click is interpreted as click on the title (when clicking at inner 50% of the window, or as a click on the border (when clicking at an area nearby the window boundary).
Sculpt supports virtual desktops (called screens for brevity) using the key combinations Super+1, Super+2, Super+3, etc. for a long time. Up until now, however, the warping of a window to another screen required a manual modification of the layouter rules, which is arguably not perfectly user friendly. Now, the user can move a window to a different screen by pressing the number key of the targeted screen while dragging the window. Alternatively, one can take the currently focused window to another screen using the key combination Super-Shift-N where N is the screen number. Naturally, for screens visible side by side in a multi-monitor setup, a window can be moved from one monitor to another by dragging the window title.
When using multiple displays in panoramic mode, screens 1-3 appear on the primary display, screens 4-6 on the second display, and screens 7-9 on a third display, if present. If a display not present, the corresponding screens fall back to the primary display. So all windows remain reachable whenever a display is disconnected. By default, the role of display (primary, secondary, ternary) is assigned according to the display's position within the panorama from left to right. So one can change their role by adjusting their order in the display driver's configuration dialog as described in Section Multi-monitor support.
Advanced use
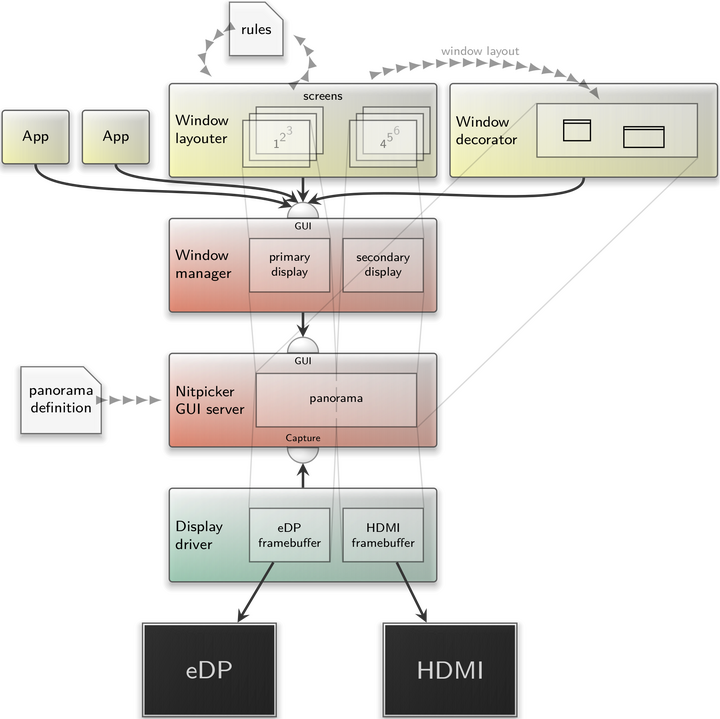
As mentioned above, the GUI stack consists of several components each having a clear-cut role.
|
Except for the nitpicker GUI server, which lives in static part of the Sculpt system, all other components can be managed interactively via the component graph.
At the bottom, one or more display drivers access the physical monitors attached to the machine. For each monitor, the driver maintains a distinct physical framebuffer and creates a capture session at the nitpicker GUI server. From the perspective of the GUI server, a display driver appears as a GUI capturing client, not unlike a screen recorder. The GUI server maintains a single panorama, which is a 2D coordinate system where GUI applications are placed. Its configuration defines which part of the panorama gets exposed to which capture client. In the example, the eDP capture client obtains the left part whereas the HDMI capture client obtains the right part. By default, Sculpt provides the configuration for the nitpicker GUI server automatically such that all connected displays appear in the panorama left to right according their order in the display-driver settings. You may review this configuration at /config/managed/nitpicker. This default, however, can be manually overridden by providing custom <capture> rules at /config/nitpicker. In practice, you may start with a copy /config/managed/nitpicker and adjust the policies to your liking. This way, you may create a custom panorama with vertically stacked or even overlapping displays.
Note that capture policies are relevant for screen-capturing scenarios as well. Without a matching policy, a capture client merely obtains a black picture. The easiest way to lift this restriction, e.g., while taking screenshots is adding a wildcard rule like this:
<default-policy xpos="0" ypos="0" width="1920" height="1080"/>
The window manager (wm) uses the nitpicker GUI server as client and acts as a GUI server itself, providing the same interface as nitpicker. Sitting in-between the nitpicker GUI server and the application, it transparently supplements the notions of windows, virtual desktops, and the keyboard focus. Among the window-manager clients, two components stand out by having special roles. The window layouter defines which application is presented at what location in the panorama by generating a window layout. The window layout is produced according to user configurable rules, which are updated by interactive layout changes like moving a window. The decorator, in turn, paints window decorations according to this window layout. Note that neither the layouter nor the decorator are able to observe information displayed by the applications or any user input directed to applications.
The window layouter introduces the abstraction of virtual desktops, named screens for brevity. Each screen can be assigned to a part of the panorama. If two screens are assigned to the same part, only the top-most screen is displayed. In the example, screens 1 to 3 are assigned to the part captured by the eDP monitor whereas screens 4 to 6 are assigned to the part captured by the HDMI monitor. The layouter rules are accessible as a plain file at the used file system under /recall/window_layouter/recall/24.12 named after the version of the file format. The file can be edited manually. When saved, the changes take immediate effect, which offers an alternative way for manipulating windows. As the rules file is a regular file, one can create a backup of the current window layout by copying the file, and switch between different layouts by overwriting the rules file by a different version. The window layout is preserved across reboots because the rules file is a regular file stored on the used file system, except when using the RAM file system. On account of multi-monitor support, the rules have been extended with the assignment of screens to displays. The rules can now host any number of display declarations as follows.
<display name="primary"/>
Optional attributes xpos, ypos, width, and height can be specified to assign a specific rectangle of the panorama to the display. Otherwise, the window layouter applies the following policy. The captured rectangles present in the panorama are assigned to displays in left to right order. This gives the opportunity to assign the notion of a "primary" or "secondary" display to different parts of the panorama by the mere order of <display> nodes. If more displays are declared than present, all unassigned displays will refer to the left-most captured rectangle of the panorama.
To get more precise control over the assignment of captured areas to displays, a display node can host any number of <capture> sub nodes that are matched against the captured areas present within the panorama. The panorama areas are named after the labels of capture clients (i.e., display drivers) connected to the nitpicker GUI server. The matching can be expressed via the attributes label, label_prefix, and label_suffix. The first match applies. E.g., the following configuration may be useful for a laptop that is sometimes connected to an HDMI display at work or a Display-Port display at home.
 <display name="primary">
   <capture label_suffix="HDMI-1"/>
   <capture label_suffix="DP-2"/>
   <capture label_suffix="eDP-1"/>
 </display>
 <display name="secondary">
   <capture label_suffix="eDP-1"/>
 </display>
When neither the HDMI-1 display nor the DP-2 display is present, the laptop's internal eDP display is used as both primary and secondary display. Once an external display is connected, the external display acts as primary display while the laptop's internal display takes the role of the secondary display.
Once declared, the display names can be specified as display attribute to <screen> nodes, thereby assigning virtual desktops to displays. Screens referring to the same portion of the panorama are organized as a stack where only the top-most screen is visible at a time. As each display has its own distinct stack of screens, one screen cannot be visible at multiple displays. To mirror the same content on multiple displays, it is best to leverage the <merge> feature of the display driver. Should a <screen> lack a valid display attribute, it spans the entire panorama.
Multi-monitor virtual machines
A notable client of the window manager in the multi-monitor setting is VirtualBox, a prime example for virtual-machine monitors. For a seamless user experience, real displays must be integrated as virtual monitors inside the VM that can be dynamically enabled or disabled. The virtual monitors then reflect the physical display configuration and can, thus, be configured in the guest operating system as a virtual panorama.
For that purpose, we extended VirtualBox by a two-stage monitor configuration. First, the <Display> node in the .vbox configuration file defines the maximum number of potentially connected virtual monitors by the monitorCount attribute.
<Display VRAMSize="64" monitorCount="2"/>
Each enabled VirtualBox monitor requests a dedicated GUI session, which is equivalent to a window on screen as described above. Now, the enablement and labeling of these sessions is done via <monitor> nodes in the VirtualBox runtime configuration as follows where up to monitorCount monitors are supported.
<monitor label="right"/>
<monitor label="left"/>
The labels can be used in window-manager rules to configure and place the corresponding window inside the panorama. The order of the nodes directly controls the connection order at the virtual graphics card, which is important for the in-guest configuration of the virtual panorama. Note that, at least one monitor configuration node is required as otherwise no virtual monitor will be enabled. This is in contrast to prior versions, which always enabled one monitor.
Display rotation
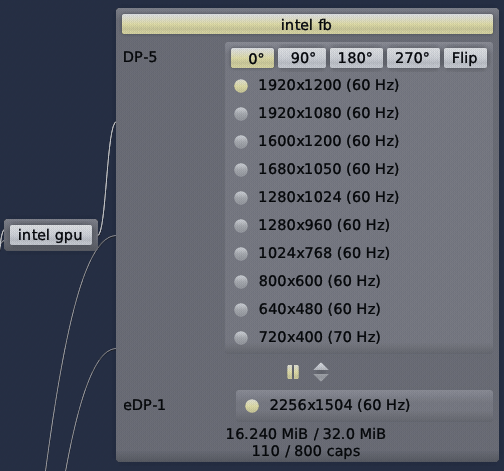
The configuration dialog of the Intel display driver now offers new screen-transformation options.
|
So by a click on a button you can switch to a portrait way of life or even flip the picture. Note that for mirrored displays, the transformation is applied on each display. In panoramic setups, each discrete display can be transformed individually. The transformation is part of the fb config. So you can make you setup permanent by copying /config/managed/fb to your /rw/config/25.04/ directory.
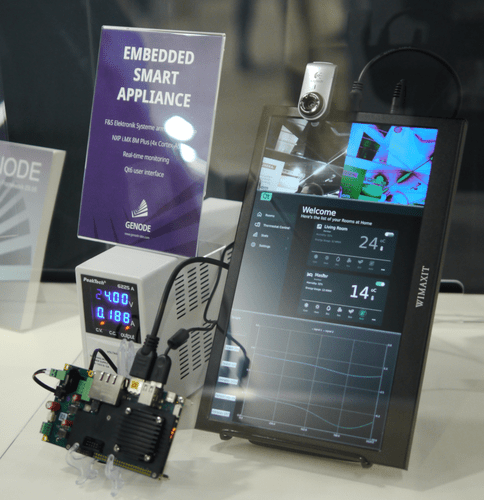
BTW, at our booth at the recent Embedded World exhibition, we made good use of the new display-rotation abilities for showcasing the use of Genode for a smart embedded appliance featuring Qt6 and the live processing of a webcam image running on an NXP i.MX8 board.
|
Assignment of directories as file systems
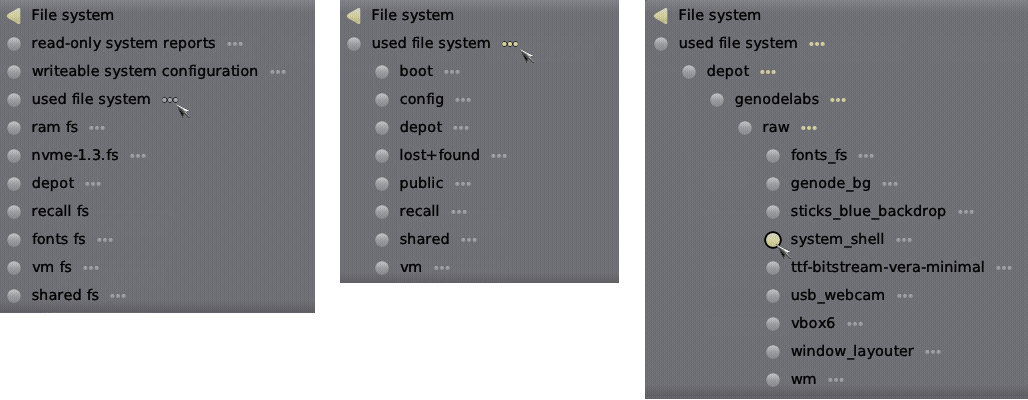
The routing dialog for new components allows the user to select a file-system server for each file system requested by the component. This granularity of policy decisions is too coarse whenever the user wants to restrict the access of the component to a specific sub directory only. Up to now, this situation required additional chroot components, one for each directory. The new version allows for the assignment of individual directories as file-system resource when integrating a new component. To browse the directories present on a file system, toggle the expand icon - symbolized by three little dots - of the file-system entry. This will narrow the view on only the single file system and its directories. Should a directory have sub directories, a corresponding expand button allows for browsing deeper into the hierarchy. To go back to a higher directory level, un-toggle the corresponding expand icon.
|
Falkon web browser using Qt6
The falkon-web-browser preset features an updated version Falkon, which is based on Qt6 and the Chromium engine 112. Note that the Qt5 version is still around should you prefer that. Both versions are offered side by side in the depot index of cproc. Look out for falkon-jemalloc and falkon_qt6-jemalloc. In the preset, you can switch from one version to the other by merely changing the corresponding pkg attribute at /config/presets/falkon_web_browser.
Enhanced security of the Goa SDK
The Goa SDK has become the primary way of porting and developing application software for Sculpt OS. In tandem with the Sculpt OS release, the Goa SDK has been updated, targeting the new version by default.
The new Goa version comes with profound security enhancements. Most importantly, it executes all 3rd-party build systems in sandboxed environments using Bubblewrap when using Goa on Linux. This gives developers peace of mind when building Goa projects containing untrusted code as commonly is the case for today's unfathomable complex tooling and build systems. Furthermore, Goa now safeguards the processing of configuration files. The entire discussion behind this line of work is worth following.
Further improvements
Under the hood, the new version received countless of further improvements like a largely reworked networking stack, SIMD-based graphics optimizations, the adoption of modern IOMMU features, and tireless work on code rigidity. As one last tidbit, users test-driving Sculpt on Qemu can now interactively change the screen mode.
|