Sculpt OS 21.10 on ARM
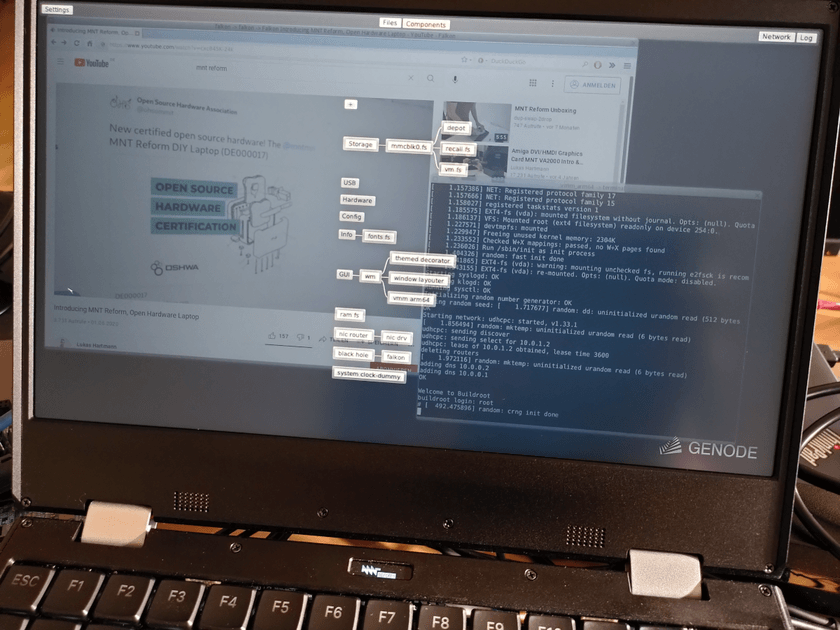
Beside the x86 architecture, the new Sculpt OS 21.10 can also be used on top of the MNT Reform 2 and i.MX 8MQ EVK board. Although those ARMv8-based boards are not yet officially supported, you can give it a first try.
Under the hood, the new Sculpt release for these ARM boards includes optimized power management, new drivers for EMMC/SD-card, and USB devices. On top of Sculpt you can try out the VMM for ARM64 package to execute a Linux guest. Of course all generic Sculpt packages are available as well, e.g., the Falkon webbrowser package.

|
|
Sculpt 21.10 on MNT Reform2 - in the background: youtube video playing in Falkon, and Linux VM terminal
|
Download and boot Sculpt OS
If you want to test out the unofficial release of the Sculpt OS for the MNT Reform 2 or i.MX 8MQ EVK board, you can download a pre-built SD-card image from here:
- Download SD-card image for MNT Reform 2
-
sculpt-mnt_reform2-21.10.img (17 MiB) signature SHA256 1bfdec649269d3ecad36e627b62dac12c848c2eed94b8465cc440d4c6844f328
- Download SD-card image for i.MX 8MQ EVK
-
sculpt-imx8q_evk-21.10.img (17 MiB) signature SHA256 223d13504ec7c9930922b041c380a9d13748c27ab4b594a03af2ed6e0c10d5c3
You can copy the image on a fresh SD-card by using dd. Assuming your SD-card is named /dev/mmcblk0 when connected to your Linux host machine, then do either:
sudo dd if=sculpt-mnt_reform2-21.10.img of=/dev/mmcblk0 conv=fsync
or:
sudo dd if=sculpt-imx8q_evk-21.10.img of=/dev/mmcblk0 conv=fsync
depending on which board you are trying to use Sculpt on top.
Building a Sculpt image from scratch
The unofficial Sculpt OS 21.10 for ARMv8 needs few tweaks in addition to the official Sculpt release for the x86 PC. Therefore, you need to checkout the corresponding topic branch from my Genode repository:
 git clone https://github.com/skalk/genode.git genode
 cd genode
 git checkout origin/sculpt_21.10 -b sculpt_21.10
Then you need to add the dedicated repository for the i.MX family, which contains all kernel and driver ingredients for the MNT Reform 2, and i.MX 8MQ EVK board:
 git clone https://github.com/skalk/genode-imx.git repos/imx
 cd repos/imx
 git checkout origin/sculpt_21.10 -b sculpt_21.10
 cd ../..
Of course, you will need the Genode toolchain 21.05, either you install it into your development environment, see the toolchain download page, or you take the Docker container available, see article Genode development container for more details.
Before, you can build Sculpt, you have to download all 3rd party sources needed first:
tool/ports/prepare_port bash coreutils curl dde_linux dde_rump e2fsprogs-lib gnupg imx8q_evk_uboot jitterentropy libarchive libc libgcrypt libpng libssh mnt_reform2_linux mnt_reform2_uboot ncurses openssl stb ttf-bitstream-vera vim xz zlib
Now, you can create the necessary depot packages. If you want to build it for the i.MX 8MQ EVK board, please change mnt_reform2 in the following to imx8q_evk
tool/depot/create genodelabs/pkg/arm_v8a/sculpt-mnt_reform2 genodelabs/bin/arm_v8a/base-hw-mnt_reform2 CROSS_DEV_PREFIX=/usr/local/genode/tool/21.05/bin/genode-aarch64- UPDATE_VERSIONS=1 -j8
To finally create the system's image, we need a build directory first:
tool/create_builddir arm_v8a
and add the imx repository to the REPOSITORIES variable in build/arm_v8a/etc/build.conf:
REPOSITORIES += $(GENODE_DIR)/repos/imx
Moreover, you have to enable the following repositories that are commented out by default:
 REPOSITORIES += $(GENODE_DIR)/repos/libports
 REPOSITORIES += $(GENODE_DIR)/repos/ports
 REPOSITORIES += $(GENODE_DIR)/repos/dde_linux
 REPOSITORIES += $(GENODE_DIR)/repos/dde_rump
 REPOSITORIES += $(GENODE_DIR)/repos/gems
By adding:
 BOARD_RUN_OPT(mnt_reform2) := --include image/imx8mq_mmc
 BOARD_RUN_OPT(imx8q_evk)   := --include image/imx8mq_mmc
you include a run-tool plugin to produce a ready-to-boot SD-card image for i.MX 8MQ centered target boards. Which will include the corresponding bootloader, Sculpt system image, and GPT partition scheme. Finally, you build this image via:
 cd build/arm_v8a
 make run/sculpt KERNEL=hw BOARD=mnt_reform2
or respectively:
make run/sculpt KERNEL=hw BOARD=imx8q_evk
The resulting image is located at var/run/sculpt.img, and can be written to an SD-card, like described at the beginning of this post.


 Stefan Kalkowski