


A Java based network filter on i.MX6 SoloX
With the recent advancements in home automation (smart home) and the Internet of Things (IoT), networking capable embedded technology has started to enter our working and home environments at an ever increasing pace. Often this leads to feature and performance driven developments that neglect the security implications of such environments. Is it desirable that the smart light bulb, when part of your local network, can access your Internet connection? Who does control the data flow in such scenarios? We think security must be an important measure in those environments, at least on par with the feature set. To accommodate the security requirements we introduce the following exemplary network filter scenario.
The network filter
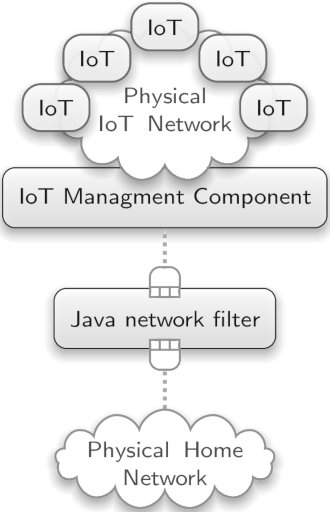
In a modern IoT setup several devices in many cases communicate through either traditional Ethernet or WiFi. Typically, there is also a management component that communicates with Internet or cloud services and orchestrates all local devices. In order to enforce security standards it becomes necessary that local devices and the management component are not able to communicate with the outside world in an uncontrolled fashion. Therefore, a network filter should be put between the management component and the local or home network acting as a gateway.
|
|
IoT network separated from home network by a network filter
|
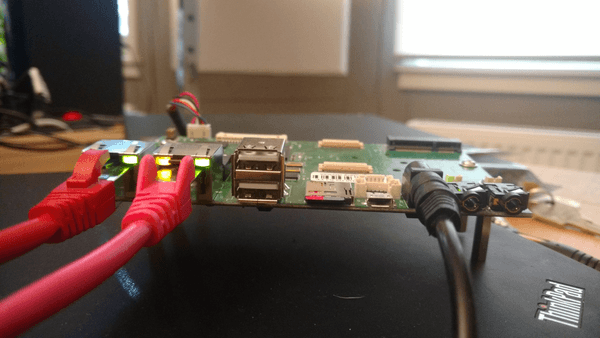
The filter must offer network separation on the hardware level while also possessing limited energy consumption. After some research we decided to go for the i.MX6 Nitrogen6 SoloX platform, since it offers a low energy ARM SoC with two physically separated network interface controllers (NICs). The next requirement we addressed was a natural programming environment for the filter policy and application-gateway logic. We chose Java as a widely-adopted high-level language known by many programmers.
So, we had to face two tasks: the enablement of Nitrogen6 SoloX platform in Genode and the port of a Java virtual machine (JVM) that supports an ARM just-in-time compiler (JIT).
|
|
Nitrogen6 SoloX board
|
The Java virtual machine
During the early two thousands everybody seemed to implement its own JVM, but these days have long been past though. I actually have witnessed a talk from Mark Reinhold (Head Steward of OpenJDK) at FOSDEM'19 where he states: "OpenJDK is Java". What are the other options? Google's ART comes to mind, but other than that most open source JVMs seem to be unmaintained, feature incomplete, or rather specialized. So we decided to port OpenJDK version 9 to Genode.
Briefly speaking, the JVM compiles pre-compiled Java byte code, which is platform independent, at runtime into machine code. Sounds trivial but there are a few stumbling blocks present. First of all there is not just one JIT compiler but two called C1 and C2. C1 is the client compiler that performs fewer code optimization steps, and thus, compiles byte code faster than C2 the server compiler that in turn performs more aggressive code optimization resulting in more efficient machine code. Additionally, there is an interpreter mode that emulates byte code on the fly. The JVM keeps statistics of how often a specific Java method is called during program execution. For the first few executions usually the interpreter mode is used. However, if a certain threshold is reached it becomes more desirable to pay the additional compilation expanse of the C1 or even the C2 compiler in order to produce more efficient machine code Because we do not anticipate server workload on an i.MX 6 platform, we opted for adding support for the interpreter mode and the C1 compiler only. The C2 compiler is omitted in our Genode port.
When we started to investigate ARM support for the C1 compiler, we noticed that ARM support had been added with OpenJDK version 8, but unfortunately only to the Linux back end. Furthermore, we were not able to find any Linux distribution where the C1 compiler had been enabled for the ARM architecture: they all offered interpreter mode only. However, depending on the Java libraries and frameworks being used, it might not provide the required performance. Since Genode's libc is based on the one of FreeBSD and is thus not compatible to the glibc as used by Linux, we had to implement the back end on our own. We had to omit any code that uses glibc specific functions and re-implement them using Genode's or FreeBSD libc semantic. Fortunately, this mostly concerned atomic instruction support and stack handling functions. We therefore were able to implement ARM C1 support in less than 300 additional lines of code on Genode.
Demonstration scenario
|
|
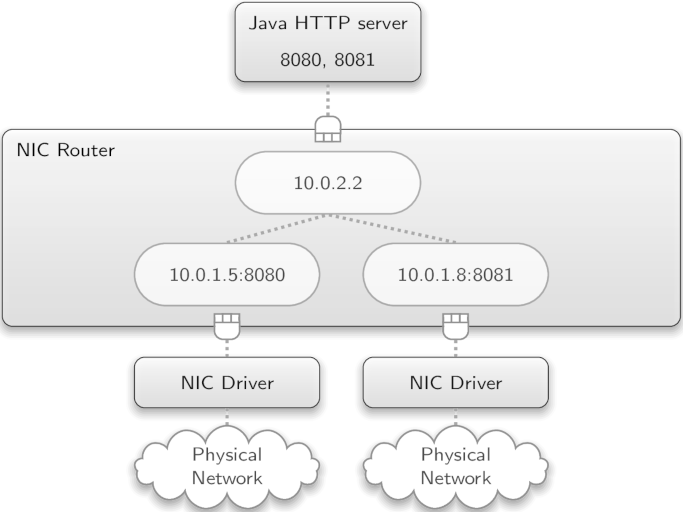
Java executing two HTTP servers separated by Genode's NIC router
|
With the platform enabled and the JVM in place, we implemented a small Genode demonstration scenario as proof of concept, featuring a Java application that has access to the two network controllers on the SoloX through Genode's NIC router. The Java application starts two HTTP servers on different ports. These ports are than routed to the two different network controllers via the NIC router. The HTTP servers can be reached from the outside using different IP addresses. The first one will display Genode core's log service, while the second server will display a stripped down version of the Genode homepage.
A similar scenario could be used to implement a fully featured packet filter in Java, but because we are not Java language experts, we stay with this small demonstration for now. It should be noticed that the NIC router can be configured to allow fine grained access to ports and NIC interfaces from and to the IoT network.
Test driving the demo scenario
If you own a Nitrogen6 SoloX board, here are steps necessary to reproduce the demo scenario:
-
Make sure Genode's toolchain for ARM platforms is installed
-
Clone the Genode and the Genode world repository
git clone https://github.com/genodelabs/genode.git
cd genode/repos
git clone https://github.com/genodelabs/genode-world.git world
cd ../
-
Create a build directory for nit6_solox
./tool/create_builddir nit6_solox
-
Enable the necessary Genode repositories, you may also do this by uncommenting the appropriate lines in build/nit6/solox/etc/build.conf directly (libports, dde_linux, dde_rump, ports, world).
sed -i "/REP.*libports$/s/^#//"  build/nit6_solox/etc/build.conf
sed -i "/REP.*dde_linux$/s/^#//" build/nit6_solox/etc/build.conf
sed -i "/REP.*dde_rump$/s/^#//"  build/nit6_solox/etc/build.conf
sed -i "/REP.*ports$/s/^#//"     build/nit6_solox/etc/build.conf
sed -i "/REP.*world$/s/^#//"     build/nit6_solox/etc/build.conf
-
Add the following lines in build/nit6_solox/etc/build.conf
RUN_OPT += --depot-user ssumpf
RUN_OPT += --include image/uboot
-
It is recommended to enable parallel building to build/nit6_solox/etc/build.conf
MAKE += -j4
-
Start to execute the boot2java run script
make -C build/nit6_solox run/boot2java
-
In the next step the build system will complain about unprepared contrib sources. Please execute what is suggested and restart the make command above
./tool/ports/prepare_port dde_linux jdk_generated
-
Additionally the build system may complain about uninstalled host tools, e.g.
Error: 'losetup' command could be not found. Please make sure to install the packet containing 'losetup', or make it available in your PATH variable. -
Also the boot2java package is missing and there are two ways to obtain it
Error: missing depot archives:
       ssumpf/pkg/arm_v7a/boot2java/2019-02-22
# Download the pre-compiled version (may fail if a different Genode version # is used. ./tool/depot/download ssumpf/pkg/arm_v7a/boot2java/2019-02-22
# or build it from the source package ./tool/ports/prepare_port libc stdcxx zlib jdk dde_rump ./tool/depot/create ssumpf/pkg/arm_v7a/boot2java UPDATE_VERSIONS=1 \ CROSS_DEV_PREFIX=/usr/local/genode-gcc/bin/genode-arm- -j4 -
Restart the boot2java run script. When the script is finished, it will ask for your sudo password in order to create the SD card image which will be located under build/nit6_solox/var/run/boot2java.img. Next we copy the image onto SoloX's SD card
sudo dd if=build/nit6_solox/var/run/boot2java.img of=/dev/<sdcard> bs=1M
-
The SoloX is now ready to boot into the Java scenario. After the internal U-Boot has started, interrupt it by pressing <Enter> and insert the following lines at the command prompt:
ext2load mmc 0:1 0xb0000000 u-boot
bootelf 0xb0000000

# the commands can also be set as default boot command
setenv bootcmd 'ext2load mmc 0:1 0xb0000000 u-boot; bootelf 0xb0000000;'
saveenv
-
Next watch for the NIC router output
report 'nic_router -> state'
  <state>
   <ram quota="9007831" used="3678208" shared="0"/>
   <cap quota="161" used="76" shared="0"/>
   <domain name="default" rx_bytes="37103" tx_bytes="573039" ipv4="10.0.1.1/24" gw="0.0.0.0" dns="0.0.0.0">
           <interface label="vfs_nic -> ">
                   <ram-quota used="3301376" limit="3400816" avail="99440"/>
                   <cap-quota used="4" limit="7" avail="3"/>
                   <arp-waiters>
                           <destroyed value="2"/>
                   </arp-waiters>
                   <dhcp-allocations>
                           <alive value="1"/>
                   </dhcp-allocations>
           </interface>
   </domain>
   <domain name="uplink_nic0" rx_bytes="303204" tx_bytes="80803" ipv4="10.0.0.19/24" gw="10.0.0.1" dns="10.0.0.2">
           <interface label="nic0">
                   <tcp-links>
                           <dissolved_timeout_closed value="1"/>
                           <destroyed value="1"/>
                   </tcp-links>
                   <arp-waiters>
                           <destroyed value="1"/>
                   </arp-waiters>
           </interface>
   </domain>
   <domain name="uplink_nic1" rx_bytes="285755" tx_bytes="91796" ipv4="10.0.0.18/24" gw="10.0.0.1" dns="10.0.0.2">
           <interface label="nic1">
                   <tcp-links>
                           <open value="1"/>
                           <dissolved_timeout_open value="3"/>
                           <dissolved_timeout_closed value="6"/>
                           <destroyed value="9"/>
                   </tcp-links>
           </interface>
   </domain>
  </state>
there are two important lines:
<domain name="uplink_nic0" rx_bytes="303204" tx_bytes="80803"
        ipv4="10.0.0.19/24" gw="10.0.0.1" dns="10.0.0.2">
and
<domain name="uplink_nic1" rx_bytes="285755" tx_bytes="91796"
        ipv4="10.0.0.18/24" gw="10.0.0.1" dns="10.0.0.2">
We can inspect that "uplink_nic0" is reachable via IP 10.0.0.19 and "uplink_nic1" via 10.0.0.18.
Using a web browser http://10.0.0.19:8080 and http://10.0.0.18:8081 should now be accessible.
Tweaking the demo
On the SD card there exists the nic_router.config file where the NIC router reads it's internal configuration from. The file can be adjusted to any scenario, for example, using static IP addresses instead of DHCP. The NIC router configuration options are described in this README.
The servlet.jar file is the one executed by Java, it can be exchanged and will be loaded during next boot time. Note that not all Java modules of the standard library are present. To see the list of importable classes please inspect the classes.tar file (also present on the SD card). The classes.tar file can be extended with other class files at will.
After running the scenario for the first time a log file is present on the SD card, which contains the information that is displayed by the second HTTP server.