


Introducing the File Vault
The File Vault is a graphical user interface that aims for making it easy for everyone to create and manage encrypted file systems in Genode. A beta version of the vault was just published for Sculpt 21.03b in my depot mstein -> Tools -> file vault. Therefore, I'll give a short overview of the program.
First of all, please keep in mind that the File Vault, so far, has not been used in a long-term in real-life scenarios. Actually, this is what the current version is all about. Therefore, you should refrain from storing critical data in it. Also, I would be happy, if you could report your findings with the vault to me!
What the File Vault does
The File Vault operates on an image file that stores an encrypted virtual block device managed through Genodes Consistent Block Encrypter (CBE). The block data of this device is encrypted using OpenSSL 1.1.1i AES CBC on 4K blocks with an IV calculated using the ESSIV algorithm from the "New Methods in Hard Disk Encryption" paper by Clemens Fruhwirth (July 18, 2005) together with the 64 bit block address and the 256 bit block encryption key.
The block encryption key is generated using the CPU Jitter Random Number Generator 1.2.0 by Stephan Mueller and can be replaced with a new random key at any time. This key is stored encrypted together with the virtual block device inside the image file. For encrypting the block encryption key, OpenSSL 1.1.1i AES CBC with a 256 bit master key is used.
The master key is not stored on the "Data" file system where the image resides but on a separate file system called "Trust Anchor". This can be, for instance, a USB stick that you wouldn't store together with your Genode machine. This way, your data remains safe even if one of the two devices gets lost. But even in the event of loosing both devices, others can't access your data as the master key is stored encrypted using the AES Key Wrap Algorithm described in RFC 3394 with the 256 bit SHA hash of a passphrase that you choose when setting up the vault.
Furthermore, the vault protects you against data manipulation. The block data in the vault is accompanied by a hash tree whose leaves are each the 256 bit SHA hash of the corresponding 4K data block. The root hash of this tree is stored inside the Trust Anchor and used to authenticate the state of the vault whenever you use it.
Last but not least, the vault protects its own integrity against sporadic shutdowns. The vault uses Copy-On-Write on payload data and metadata in a way that the last complete state is always kept intact in the image until a new complete state has been written out successfully. Only when the new state is complete in the image, the stored hash of the old state is replaced with that of the new one in the Trust Anchor, i.e. the old state is released and the new one activated.
Writing out a vault state to the image is done when the user issues a "Sync" operation at the file system, while changing the key or the dimensions of the vault, and when shutting down the vault.
How to use the File Vault
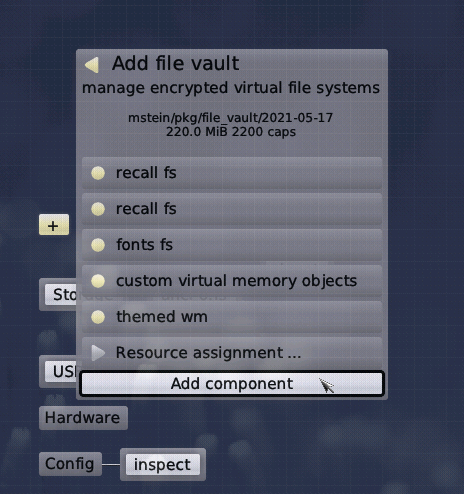
Let's say you are new to Genode and want to start the File Vault for the first time, just to give it a quick try. You have to set up some prerequisites first. You should begin with choosing a storage device for Genode and "use" it. Then you can start the + -> recall fs component. The Recall FS provides a file-system service where each session receives its own root folder on the used storage device based on the session label. This is handy as it allows us to store the Trust Anchor and the vault data in different directories without much effort from our side. Later on, you might want to use other file-system back-ends of course.
|
Furthermore, we'll need a font server. I'd suggest you to start GUI -> fonts fs from the genodelabs or mstein depot. A GUI server is also required. You can use the GUI -> themed wm package from the above mentioned depots for this.
Once the File Vault starts, it recognizes that you haven't set up a vault in the back-end file-systems (recall FS) so far. Therefore it shows the setup dialog asking you for some parameters required for creating a new vault.
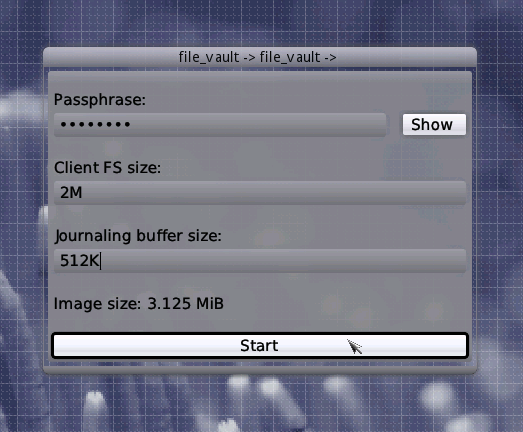
You need to choose a passphrase that is used for encrypting the master key and you have to set the initial vault dimensions. You can navigate using the mouse or Tab key in this dialog. The Hide/Show button at the right allows you to check that you've entered your passphrase correctly. Note that the image size is greater than the sum of client FS and journalling buffer as the vault always requires some metadata. When all your parameters are fine, a click to the Start button or simply pressing Enter will start the process of creating a new vault. After a short while, the main controls pop up.
|
This is the moment where you can start using your vault by connecting file-system clients to it. In order to see how it works, you can simply use the "Tools -> system shell" package from the genodelabs or mstein depot. Just connect the requirement "File system (target)" of the package to "file vault". The component should show up in form of a bash-prompt window. Your vault is mounted to /rw in this bash and you can now go on creating and modifying files in this directory. As soon as you close system shell and file vault, these will be inaccesible for others.
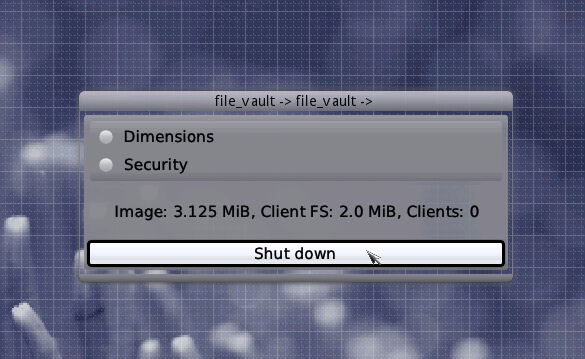
Let's have a look at the main-controls dialog of the file vault again. The Shutdown button at the bottom will synchronize all cached vault state and then close the application. When closing the application without using this button, you might loose some of the data that you wrote most recently to the client file system. The integrity of the vault, however, would not be affected.
|
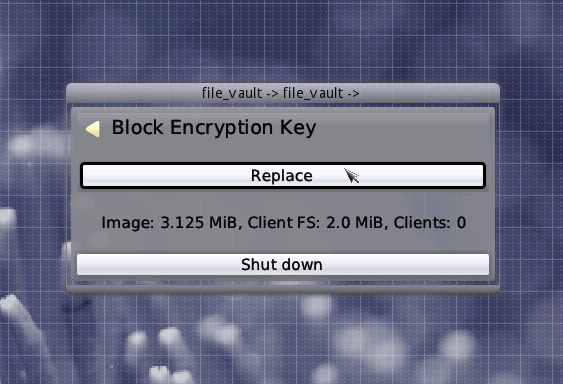
Above the Shutdown button, some live status information is shown. The overall size of the vault image in the Data file system, The size of the file system provided to the clients of the vault, and the number of clients currently connected to the vault.
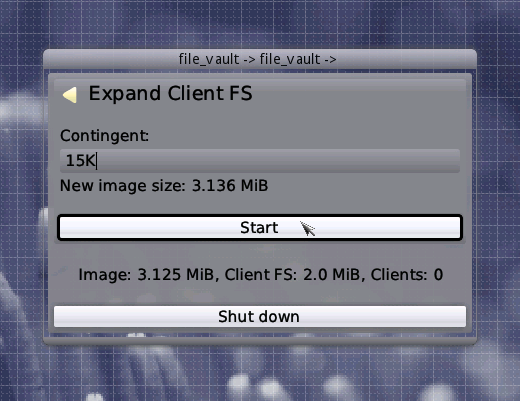
At the top, you can see a menu of two entries, "Dimensions" and "Security". When entering the Dimensions menu, two submenus "Expand Client FS" and "Expand Journalling Buffer" show up. The former allows you to increase the size of the file system provided to the clients of the vault. Note that the granularity of this operation is 4 KiBytes as this is the block size of the virtual block device inside the vault. Also, the operation isn't available if there are clients connected to the vault. This is because the vault uses the ext2 file system for its client FS which can't be expanded on-line. When the Start button shows up inside the "Expand Client FS" dialog, you can again click it or simply press Enter to start the operation
|
This also applies for the dialog "Expand Journalling Buffer". But here you expand the buffer that the vault keeps for doing the Copy-On-Write on the virtual block device. In contrast to expanding the client FS, this operation can be done even while clients are connected to the vault. However, it has the same granularity restiction.
Going back to the main controls dialog and now entering the "Security" menu, we are presented with the submenu "Block Encryption Key". In this submenu, you can replace the block encryption key that is stored encrypted inside the vault image with a new pseudo-randomly generated one. This can be done on-line again. But be aware that it might require some time depending on the size of your vault as the whole vault has to be re-encrypted.
|
Now, if you shut down your vault and re-start it on the same Data / Trust-Anchor file-systems, it will detect the existing vault and, consequently, ask you for the passphrase. The passphrase you enter will be authenticated through the key wrap algorithm on the Trust Anchors master key. If it is correct, the decrypted master key is as well. The master key is then used to unlock the vault and the main controls are shown again. I the passphrase was incorrect, you have to wait 3 seconds in order to re-type it and retry unlocking the vault.
Related articles
Modification history
-
2021-05-18 by Martin Stein: Add passage about client system-shell
-
2023-10-25 by Martin Stein: Add links to related articles