


The CBE series #3 - A Linux VM on a CBE device
In the Genode 20.05 release notes we teased using the CBE for running encrypted VMs in Sculpt. This article will guide you through setting up a CBE device, installing and using a Linux VM on it, and controlling the CBE online - like creating snapshots, resizing the device, or doing a rekeying.
The CBE series
This series of articles describes the features and integration of the Consistent Block Encrypter (CBE) in detail. The CBE is a block-device encryption component with its core logic entirely written in SPARK. It combines multiple techniques to ensure confidentiality, integrity, consistency, and freshness of the block data efficiently. Furthermore, the whole core logic so far passes gnatprove in mode "flow".
In case you are not familiar with the basic structure of the CBE, I'd recommend you this introduction before reading on:
The other articles in this series so far:
The source code on GitHub:
Note that the above branches are not the ones used for the packages in this tutorial. They mark the CBE mainline based on most recent Genode 20.05 while the packages in this tutorial had to be built for Genode 20.02 to be compatible with the most recent Sculpt version.
Prerequisites
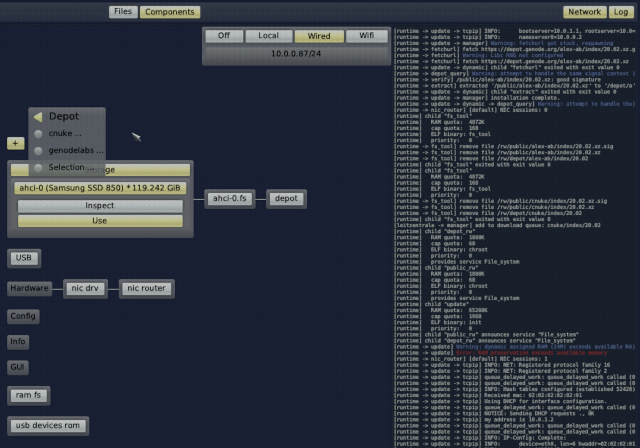
To follow the guide described in this article you need to have a Sculpt installation at hand with at least 2 GiB of free space to spare on the used file system. We want to be able to inspect the log output of the CBE tools. For this reason you should enable the log display in the upper-right corner of the Leitzentrale of your Sculpt. Furthermore, we will need to have an internet connection. You can establish the connection using the Network controls in the upper-right corner of the Leitzentrale. In order to be able to deploy the required packages, the package sources genodelabs and cnuke must be enabled in + → Depot → Selection.
|
Then, a window manager is required. If you do not already have one deployed, you may use the "Themed WM" for this. Select + → Depot → genodelabs → GUI → themed wm → Install. When the installation is done you should wire the window manager as follows:
-
GUI (focus) → keyboard focus
-
GUI → system GUI server
-
Report (shape) → pointer shape
-
Report (clipboard) → global clipboard
-
ROM (clipboard) → global clipboard
We also need a font server. If you don't have one already, you may install the "Fonts FS" package by selecting + → Depot → genodelabs → GUI → fonts fs → Install and integrating the package with the following routes:
-
ROM (config) → system font configuration
Finally, we will use the noux-system package as system shell. If you don't have the package deployed already, select + → Depot → genodelabs → Tools → noux-system → Install and integrate the package using the following routes:
-
GUI → themed wm
-
File system (config) → writeable system configuration
-
File system (report) → read-only system reports
-
File system (target) → used file system
-
File system (fonts) → fonts fs
-
ROM (vimrc) → default vim configuration
-
ROM (clipboard) → themed wm
-
Report (clipboard) → themed wm
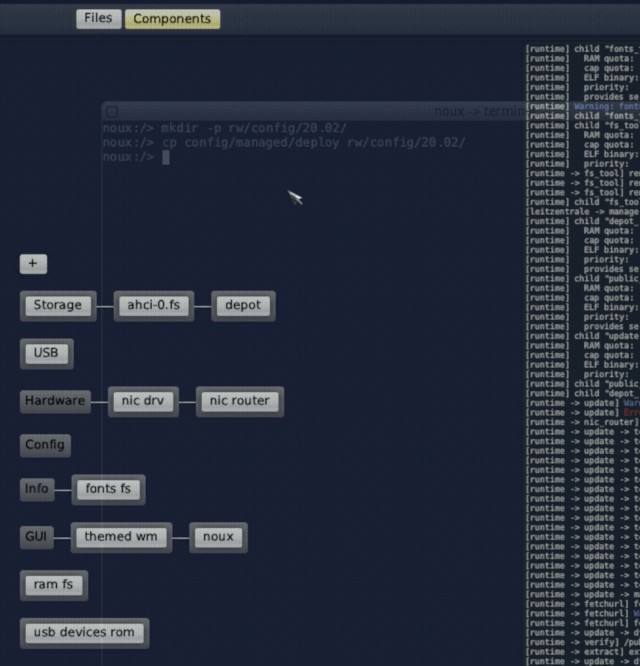
Finally, you may want to save this setup by copying the deployment config to persistant storage using the noux-system terminal:
 noux:/> mkdir -p rw/config/20.02
 noux:/> cp config/managed/deploy rw/config/20.02/
|
Preparing the CBE image file
Our CBE device will be backed by a disk image file. The device will provide a virtual block device (VBD) of 1 GiB size to the user while having 128 MiB worth of sparse blocks available for storing snapshots. Then, we will install a Linux VM on the device.
So, let's start by switching into the run-time view by pressing F12 and there to the noux-system prompt. The following command will create the directory holding the CBE's disk image file in the root directory of the used file system:
noux:/> mkdir /rw/cbe
With the directory in place, we move on to deploy another component, a cbe fs instance, from within the Leitzentrale (press F12 again). This package contains a pre-configured chroot component that we use to limit the file-system access of the CBE and its tools to the afore created directory. The package can be installed by selecting + → Depot → cnuke → CBE → cbe fs → Install. We use the following routes for the package:
-
File system → used file system
All further administration regarding the CBE shall use the deployed chroot environment. Consequently, we need another system shell that is routed to the chroot file system. We could use a second noux-system instance for this, but noux-system is meant to provide a minimal setup and therfore misses tools like dd that will be necessary for this tutorial. Because of that, we created a cbe shell package that fullfills our requirements. You can install it by selecting + → Depot → cnuke → CBE → cbe shell → Install. The routes for the package are as follows:
-
GUI → themed wm
-
File system (cbe) → cbe fs
-
File system (fonts) → fonts fs
-
ROM (clipboard) → themed wm
-
Report (clipboard) → themed wm
-
Region maps → custom virtual memory objects
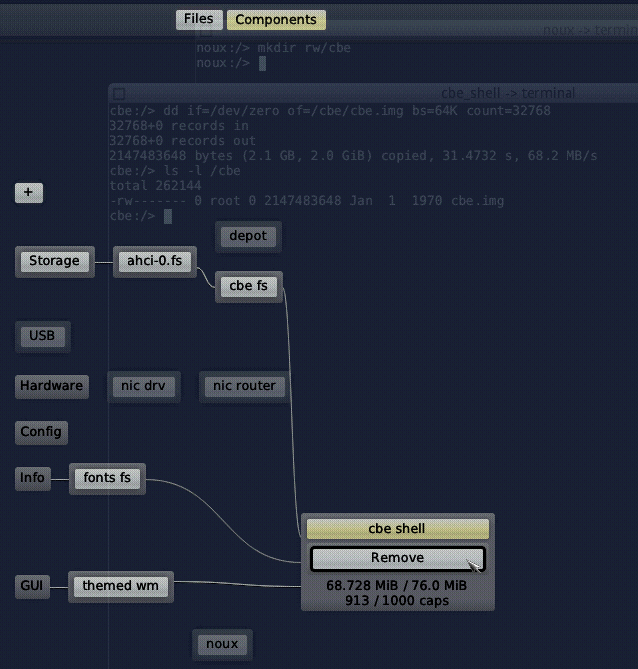
After deploying it, we should be greeted with a terminal featuring a cbe:/> prompt in the background. The cbe file system is mounted at /cbe in this new environment. Navigating into that directory in the CBE shell and executing ls should show an empty directory. Now, we are going to use dd to create the disk image file:
cbe:/> dd if=/dev/zero of=/cbe/cbe.img bs=64K count=32768
Note that it does not matter whether it is a sparse file or not.
The command created a 2 GiB disk image file, which is enough to store our anticipated CBE device with a 1 GiB virtual block device and 128 MiB sparse blocks. Note that we need some more space for storing additional internal meta data which is why the disk image file needs to be a bit larger. Let's check the size of the disk image:
 cbe:/> ls -l /cbe
 -rwx------ 1 root 0 2147483648 Jan  1  1970 cbe.img
Finally, we can remove the CBE shell again in the Components graph of the Leitzentrale.
|
Initializing the CBE
The first CBE tool we want to use is the cbe_init component. Its purpose is to create an empty CBE device by initializing the CBE's meta data in the back-end storage. There is a package configured to create a CBE device with a VBD of 1 GiB and with 128 MiB worth of sparse blocks using the cbe_init component. You can install the package by selecting + → Depot → cnuke → CBE → cbe init → Install. It needs one route to be set:
-
File system (cbe fs) → cbe fs
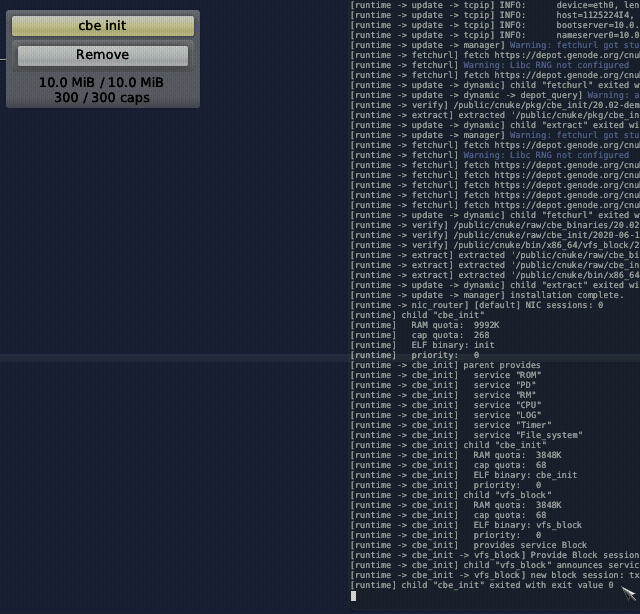
After a short while, you should see the following message in your system log:
[runtime] child "cbe_init" exited with exit value 0
You can then remove the component from the runtime-graph in the Leitzentrale.
Your CBE is now fully prepared. You may have wondered why you didn't have to provide any key or passphrase for the initialization. This is because, at the moment, the trust-anchor entity of the system is a mere place-holder that is meant to be replaced by a proper implementation in productive contexts. The place-holder is using a hardcoded value as private key. This value is simply XORd with a counter to produce the symmetric keys used for cryptographic operations.
|
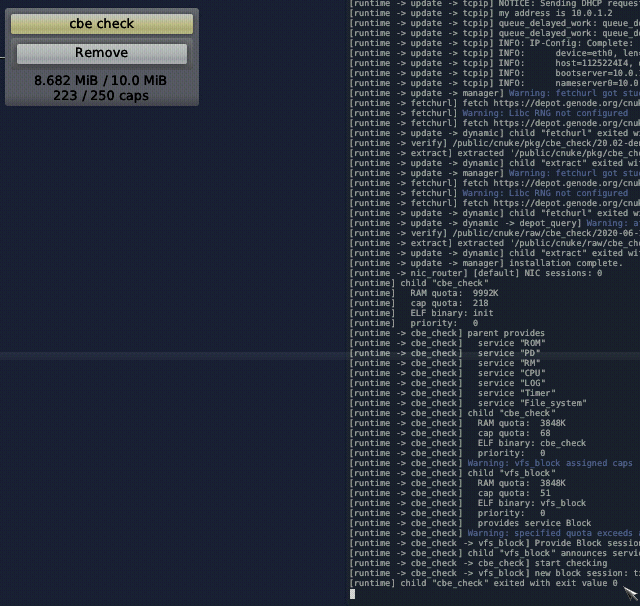
Checking the CBE
Just to make sure that the newly initialized CBE is indeed in a working state, let's check it. We can deploy the cbe_check component for this by selecting + → Depot → cnuke → CBE → cbe check → Install and setting this route again:
-
File system (cbe fs) → cbe fs
The CBE-check tool will check the hashes of all data and meta data blocks in the CBE device. After some time, there should be the following message in your system log:
[runtime] child "cbe_check" exited with exit value 0
This means that the check was successful and the CBE check instance can then be removed again like CBE init before.
|
Preparing a VM for using the CBE
With the initialized disk image in place let's prepare the VM.
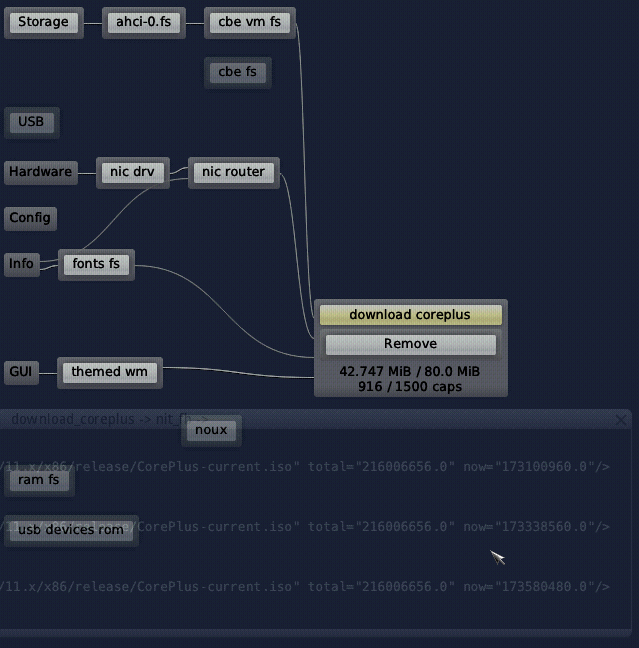
In case you do not have a CorePlus installer.iso image at hand, there is a ready-to-use downloader package for that. But before we can use the downloader, we have to provide a target file system. Therefore, we deploy the cbe vm fs package by selecting + → Depot → cnuke → CBE → cbe vm fs → Install and setting the route:
-
File system → used file system
Like the cbe fs package, the cbe vm fs is a chroot component pre-configured for the CBE, It will point to the /vm/cbe directory on the currently used file system. Now, we can deploy the downloader by selecting + → Depot → cnuke → Virtual machines → download coreplus → Install and setting these routes:
-
GUI → themed wm
-
Network → nic router
-
Region maps → custom virtual memory object
-
File system (target) → cbe vm fs
-
File system (fonts) → fonts fs
The progress of the download will be shown in a new terminal window. This may take some time as the image has a size of more than 200 MB. At the end, this message in the system log should indicate that the download was successful:
[runtime -> download_coreplus] child "download" exited with exit value 0
The download coreplus instance can now be removed in the component view of the Leitzentrale.
|
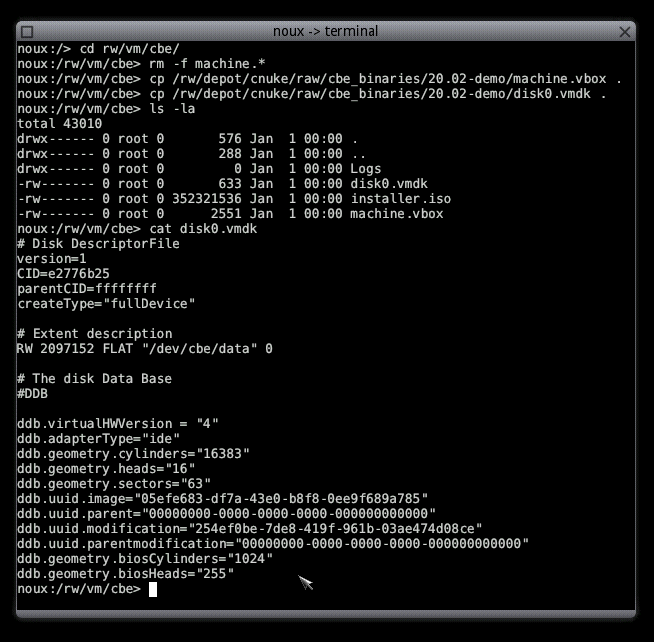
Then, we switch to the noux-system shell. There, we navigate to /rw/vm/cbe and delete files machine.vbox and machine.vdi. The files are not needed in the context of this tutorial.
 noux:/> cd /rw/vm/cbe
 noux:/rw/vm/cbe> rm machine.*
The files that we will use instead are part of the archive cbe binaries that was already downloaded as dependency of the other packages. So, we can directly copy them to the VM directory:
 noux:/rw/vm/cbe> cp /rw/depot/cnuke/raw/cbe_binaries/20.02/machine.vbox .
 noux:/rw/vm/cbe> cp /rw/depot/cnuke/raw/cbe_binaries/20.02/disk0.vmdk .
 noux:/rw/vm/cbe> ls -l
 -rwx------ 1 root 0       629 Jan  1  1970 disk0.vmdk
 -rwx------ 1 root 0 352321536 Jan  1  1970 installer.iso
 -rwx------ 1 root 0      2551 Jan  1  1970 machine.vbox
Note that the disk0.vmdk is configured to access the CBE through the local VFS:
 noux:/rw/vm/cbe> cat disk0.vmdk
 […]
 RW 2097152 FLAT "/dev/data" 0
[…]
VirtualBox, at the other hand, is configured in machine.vbox to use the /disk0.vmdk file.
|
Setting up the CBE-VFS server
Before we can start the VM, we have to start the CBE. In this tutorial, the CBE device is provided by the CBE-VFS plugin running in its own VFS server. This server is accessed by the VM via a file-system session. The cbe vfs package provides a pre-configured VFS server with CBE plugin. It can be deployed by selecting + → Depot → cnuke → CBE → cbe vfs → Install and setting the following route:
-
File system (cbe image) → cbe fs
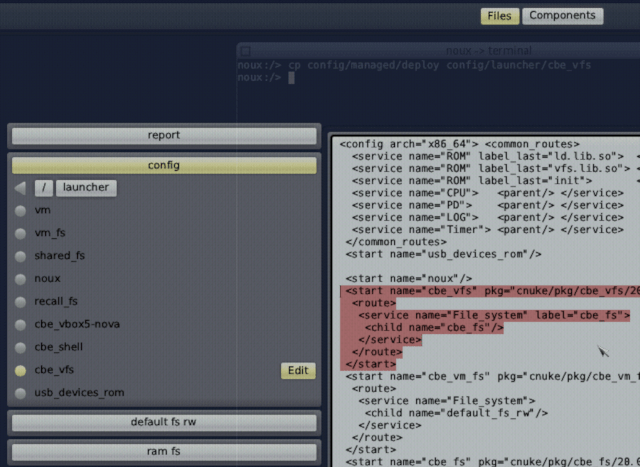
The CBE VFS server might consume quite some CPU time depending on the workload on the CBE. Therefore, it is recommended to move it to a different CPU core than the one we will later use for the VM (provided your CPU has multiple cores). This can be done by creating a launcher for the CBE VFS server. While the component is still running, we create a copy of the active deploy configuration in the noux-system shell:
noux:/> cp /config/managed/deploy /config/launcher/cbe_vfs
We can now go to the Files panel centered at the top of the Leitzentrale and select config → launcher → cbe vfs → Edit. The file will be opened in a graphical editor and we can delete everything from it except the <start> node of the CBE VFS server:
 <start name="cbe_vfs" ...>
 ...
 </start>
|
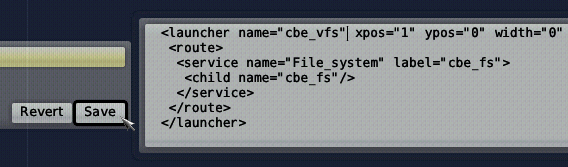
Then, we change <start ...> into <launcher ...> and </start> into </launcher> and extend the opening launcher tag with the attributes xpos="1" ypos="0" width="1":
 <launcher name="cbe_vfs" xpos="1" ypos="0" width="1" ...>
 ...
 </launcher>
|
This will move the cbe vfs component to the second CPU core when started with the launcher. After saving the file we switch back to the Components graph at the top of the Leitzentrale, remove the currently running cbe vfs component from the graph and deploy it again by using our newly created launcher + → cbe vfs.
Installing a Linux guest in the VM
Now, it is time for the exciting part: installing CorePlus in the VM. The Virtual Box we are using for this wants a file system for shared folders. Therefore, we start the Shared FS by selecting + → shared fs.
Then, we'll use a pre-configured package for Virtual Box 5. It can be installed selecting + → Depot → cnuke → CBE → cbe vbox5-nova → Install and setting the following routes:
-
File system (vm) → cbe vm fs
-
File system (cbe) → cbe vfs
-
File system (shared) → shared fs
-
Network → nic router
-
GUI → themed wm
-
ROM (capslock) → global capslock state
-
ROM (platform info) → platform information
-
Report (shape) → themed wm
-
Report (clipboard) → themed wm
-
ROM (clipboard) → themed wm
-
Region maps → custom virtual memory object
-
Real time clock → system clock
-
USB → direct USB-device access
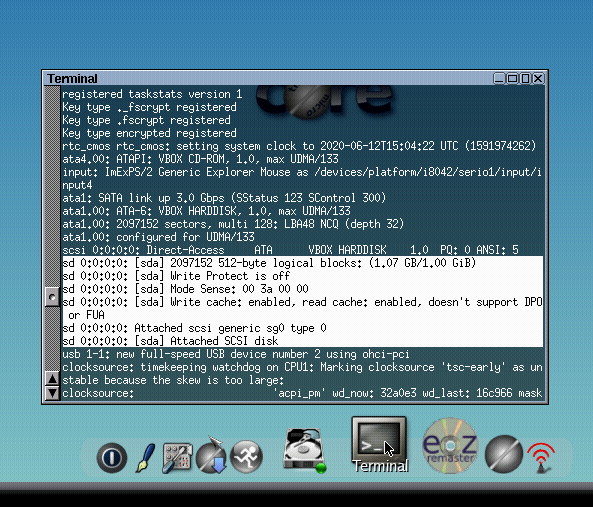
A screen titled "Core plus networking, installation, and remastering" shows up. In this screen, we select "Boot Core Plus with default FLWM topside". After a short while, the CorePlus desktop appears. You can now open a terminal in CorePlus and type dmesg. In the command output, you should find our CBE disk:
 [sd 0:0:0:0: [sda] 2097152 512 byte logical block: (1.07 GB/1.00 GiB)
 [sd 0:0:0:0: [sda] Write Protect is off
 ...
 [sd 0:0:0:0: [sda] Attached SCSI disk
|
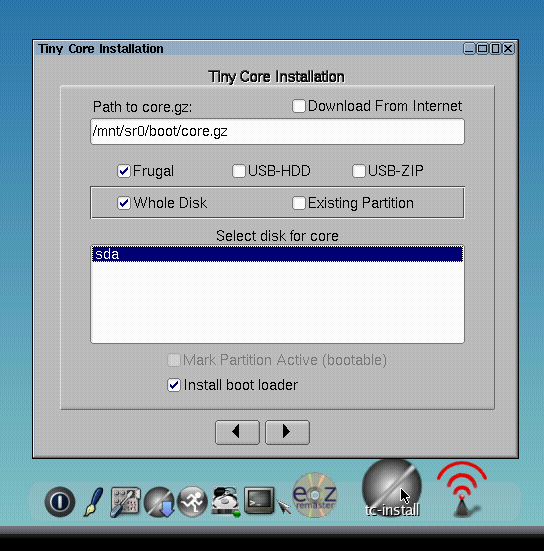
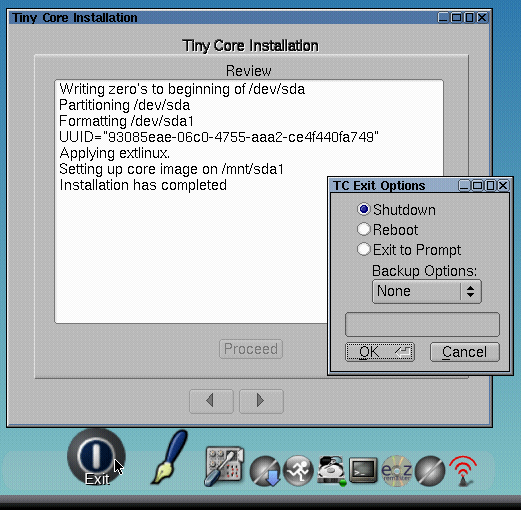
Now, we want to install CorePlus to the CBE disk. Therefore, we start TC-install in the application bar. In the TC-install window, we select "Whole Disk", select "sda" below, and make sure "Install boot loader" is selected. Then, we continue with the right arrow, select "ext4" in the next dialog, skip the next dialog, select "Core and X/GUI Desktop" in the next dialog, and, in the final dialog press "Proceed" to start the installation. After a while, "Installation has completed" shows up in the installation window. We can now select shut down CorePlus and then remove the Virtual Box instance from the Components view in the Leitzentrale.
|
|
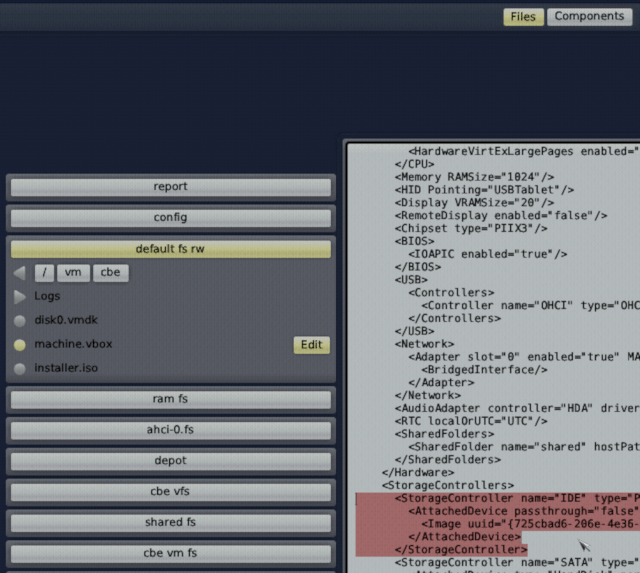
Let's remove the installation image from the VM to force it to boot from the CBE disk. Go to the Files panel in the Leitzentrale and select default fs rw → vm → cbe → machine.vbox → Edit. Now, remove the following XML snippet from the file:
 <StorageController name="IDE" ...>
    <AttachedDevice ... type="DVD">
    ...
    </AttachedDevice>
 </StorageController>
|
Then, we save the file and switch back to the Components view where we can start again the cbe vbox5-nova the same way as we did before.
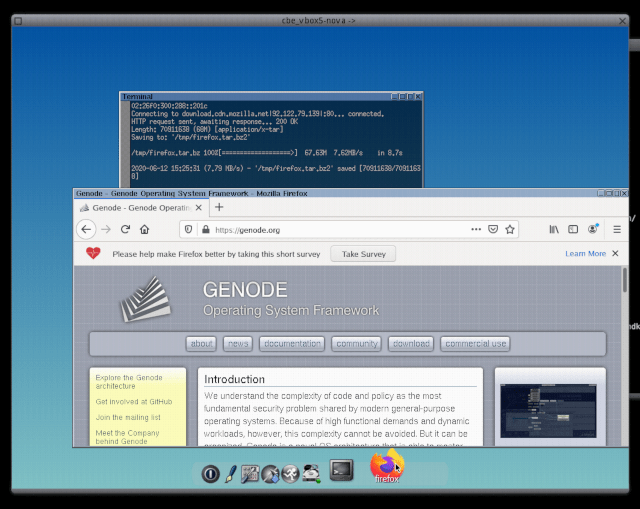
How about putting some load on the system? If we open a terminal in CorePlus we can start the command-line extension installer:
tce
We type s, enter "firefox", select "firefox_getLatest.tcz", type q, and then i to download a shell script for installing the Firefox browser. Then, we quit the extension installer via q and issue firefox_getLatest.sh in the terminal. This may take a while. If some connection times out during the installation you can just start the shell script again. The freshly installed Firefox should work just fine although the initial loading may be a bit slow.
|
Using the management shell to control the CBE
With the VM in place, we might want to perform some management work. An example would be creating snapshots of the CBE device. With a snapshot, we would have a checkpoint we can revert to in the future after some catastrophe like rm -rf * in the wrong directory has happend. Or maybe the VBD turns out to be too small. Then, we would like to resize it. Or imagine you want to re-encrypt the whole CBE device with a new key. All those tasks can be performed using the cbe shell package. We have already used it before to create the disk image file. Now, we deploy it again but this time we select the following routes:
-
GUI → themed wm
-
File system (cbe) → cbe vfs
-
File system (fonts) → fonts fs
-
ROM (clipboard) → themed wm
-
Report (clipboard) → themed wm
-
Region maps → custom virtual memory objects
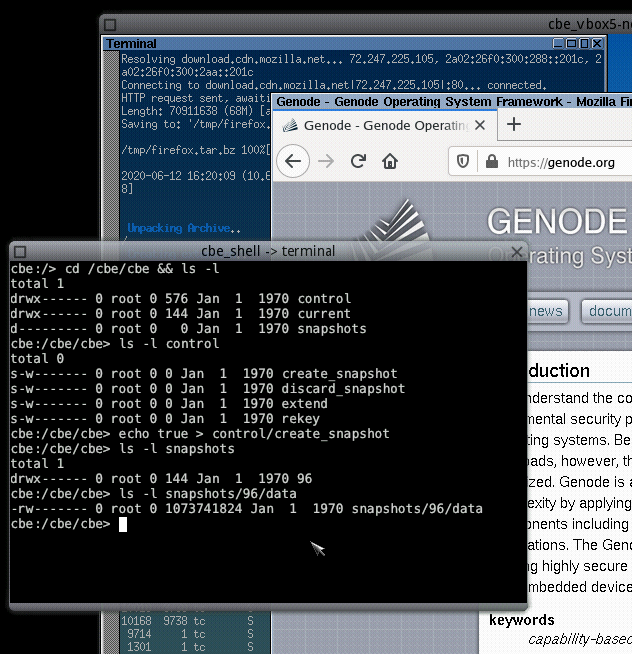
Note that the "File system (cbe)" now points to "cbe vfs" instead of "cbe fs". This way, we have access to the control interface of the CBE provided through the VFS plugin. Within the CBE shell, we navigate to the cbe/cbe directory that contains the CBE-VFS plugin:
 cbe:/> cd /cbe/cbe && ls -l
 total 1
 drwx------ 1 root 0 576 Jan  1  1970 control
 drwx------ 1 root 0 144 Jan  1  1970 current
 d--------- 1 root 0   0 Jan  1  1970 snapshots
The control directory contains various files to trigger management tasks:
 cbe:/cbe/cbe> ls -l control
 total 0
 s-w------- 1 root 0 0 Jan  1  1970 create_snapshot
 s-w------- 1 root 0 0 Jan  1  1970 discard_snapshot
 s-w------- 1 root 0 0 Jan  1  1970 extend
 s-w------- 1 root 0 0 Jan  1  1970 rekey
Creating a snapshot
First let's create a snapshot of the current state of the newly installed CorePlus system:
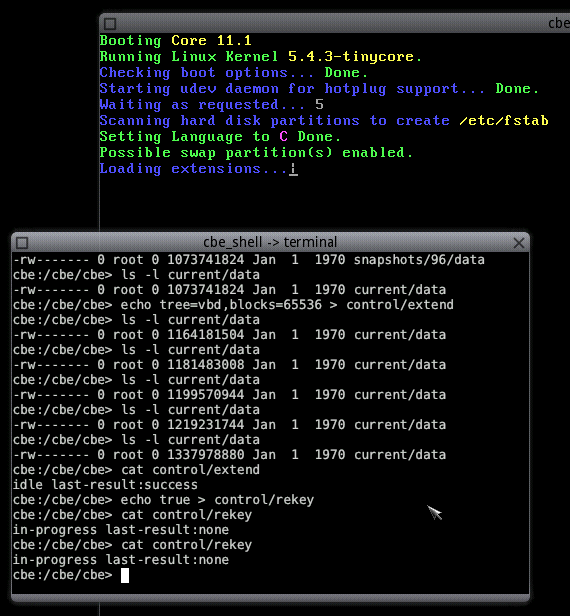
cbe:/cbe/cbe> echo true > control/create_snapshot
Creating a snapshot is a lightweight operation and so by the time you inspect the snapshots directory, you should already see the newly created snapshot:
 cbe:/cbe/cbe> ls -l snapshots
 drwx------ 1 root 0 144 Jan  1  1970 12130
Checking the snapshot's data file confirms the existence of the snapshot. The actual data of the snapshot may be accessed through this file.
 cbe:/cbe/cbe> ls -l snapshots/12130/data
 -rw------- 1 root 0 1073741824 Jan  1  1970 /dev/cbe/snapshots/12130/data
|
Extending the CBE
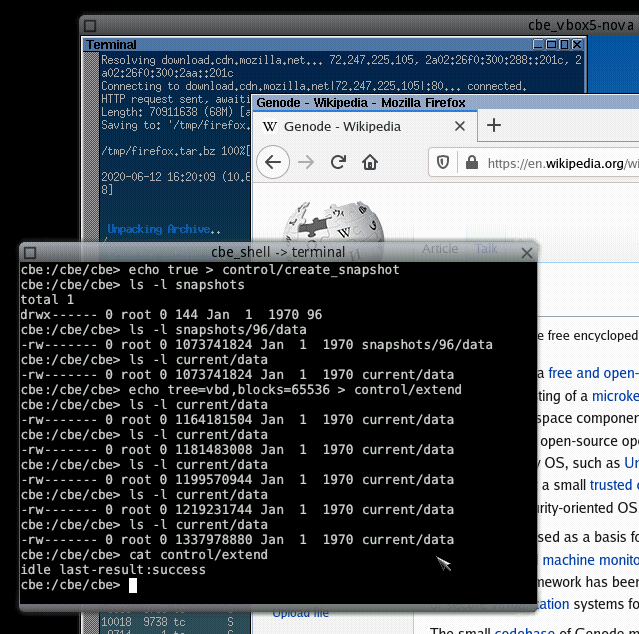
Now, let's extend the virtual block device of the CBE. Note that you don't have to shut down the Linux VM for doing so. You can even continue using CorePlus while extending the underlying CBE device. So, first, we should check the size of the current state of the VBD in the CBE shell:
 cbe:/cbe/cbe> ls -l current/data
 -rw------- 1 root 0 1073741824 Jan  1  1970 data
Now, we will extend the VBD by 256 MiB (note that we have to stay inside the boundaries of our 2 GiB back-end image):
cbe:/cbe/cbe> echo tree=vbd,blocks=65536 > control/extend
Writing these options into the extend file instructs the CBE to add _65536 blocks * 4096 bytes = 268435456 bytes_ to the VBD. While the request is processed, we can watch its progress by looking at the size of the VBD:
 cbe:/cbe/cbe> ls -l current/data
 -rw------- 1 root 0 1154482176 Jan  1  1970 data
Eventually, we should end up with a size of 1337978880 bytes. You may wonder that this is only 264237056 more than 1 GiB, but this is logical as the CBE needs a certain amount of the added blocks for new meta data in the VBD. The state of the extension request can also be observed by reading the extend file:
 cbe:/cbe/cbe> cat control/extend
 in-progress last-result:none
 ...
 cbe:/cbe/cbe> cat control/extend
 idle last-result:success
Extending the pool of sparse blocks in the CBE works pretty similar:
cbe:/cbe/cbe> echo tree=ft,blocks=16384 > control/extend
|
Rekeying the CBE
At some point we might want to change the block-encryption key used by the CBE, maybe because it is demanded by policy or the old key is compromised or we simply feel like it. This requires a re-encryption of all data in the CBE-device and ends with the removal of the old encryption key from the CBE. Note that, like with resizing, rekeying does not require you to stop accessing the CBE device. You can go on using CorePlus during the rekeying. So, let's start a rekeying:
cbe:/cbe/cbe> echo true > control/rekey
And off we go. Like with extension requests, we can monitor the state by reading the file:
 cbe:/cbe/cbe> cat control/rekey
 in-progress last-result:none
As you can see, I just rebooted my VM while rekeying the underlying CBE device. But be aware that during rekeying and resizing, block IO on the CBE device is naturally not as fast as in absence of these operations.
|
Limitations
This guide served as a first look to show the potential of the CBE. Before advertising the CBE as production-ready we plan to refine the following aspects.
At its core, the CBE itself is designed to perform all operations in an asynchronous and parallel way. This provides the necessary throughput and responsiveness needed later on when used on a daily basis. However, for the time being and particular in this demo, it is deliberately operated with “applied parking brake” to ease further developments. That means all requests are processed one by one in a sequential fashion and the internal meta-data cache is limited.
In addition, as noted in Initializing the CBE, the trust-anchor is a mere placeholder that provides the functionality required by the CBE. It is nothing more than a development-vehicle, which we will replace later.
Also the external entity for performing the cryptographic operations is easily replaceable. Currently we use a library named libsparkcrypto to apply an AES encryption. But the design of the CBE actually makes it independent from the concrete implementation of the encryption entity. Later on, it is reasonable to utilize some kind of hardware-aided encrytion/decryption mechanism to relieve the CPU. The design opens up all kinds of interesting possibilities. For example, it could even forgo encrypting the data blocks. Although, at first, this seems counterintuitive, in such a configuration the CBE could be used to add support for snapshotting to a primitive file system at the block-device layer.
Futhermore, the current interface of the CBE-VFS plugin is tailored to interactively show-casing the CBE. In the future, a component should provide a nicer user-interface for the CBE. The CBE-VFS plugin should then be controlled in a more structured, perhaps XML-based, way, like in the rest of Genode.
With regard to this demo, most of the CBE components used are provided in a somewhat unorthodox way: as a raw archive containing the x86-64 binaries directly. Naturally, this will be addressed with proper depot recipes and packages in the future.